
One application used as a flagship among brain-computer interfaces is the “P300 speller”. It relies on a specific kind of brain signal, an event-relate potential that appears when rare stimuli occur1, and that – in this case – is used to recognize which letters one want to spell, relying only on brain activity. It is a slow process but it is working – mainly. Besides the “wow” effect – that won’t last long – this kind of tool could help people with severe loss of motor function.
To make a P300 speller work we have 2 roads. The easy one – just open sequentially the p300-xdawn-* scenarios that come with OpenViBE – and the hard one, which necessitates more steps before you could jump in, but which also leads to a way more accurate application. We are warriors, we take the long journey, aiming at the “CoAdapt P300 Speller”.
This documentation is loosely based on http://openvibe.inria.fr/coadapt-p300-stimulator-tutorial/. It takes for granted that you already have a working installation of OpenViBE and that you manage to stream data from OpenBCI to OpenViBE – see here and here for details. All in all there’s nothing fancy in here, just trying to document thoroughly one particular setup. You may want to understand how OpenViBE works and what a P300 speller is about before you proceed.
Requirements
Hardware
- A shiny OpenBCI board, tested with 8 channels / chipKIT version and the same gold cup electrodes that come with the R&D kit
Operating system
While the present guide should work on Windows, it’s with Linux that we will play at the moment. Tested on Ubuntu 14.04.
Software
- OpenViBE, tested with version 0.18
- OpenBCI Python with some custom modifications
Note: the python script doesn’t allow (yet) any kind of configuration regarding the board, see OpenBCI GUI and OpenvibeLink Processing library if you have special needs.
Electrodes placement
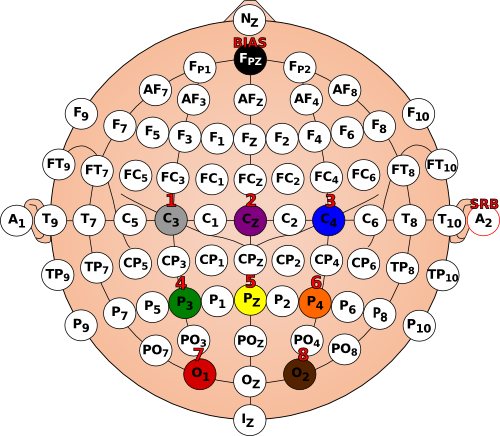
We will use the international 10-20 system to localize our electrodes, targeting the rear area of the scalp. The electrodes will be connected, in that order, to C3, Cz, C4, P3, Pz, P4, O1, O2 (see figure below). While I used a dedicated EEG cap and a bit of 3D printing magic to hold my electrodes in the right spots, it should not be that dramatic if you approximate the desired locations. Indeed, a spatial filter will learn later on which combination of electrodes yields the best signal.
There’s different possible configurations for the ground and reference electrodes. We will choose to put them respectively on the forehead and on the right earlobe. We assume that the ground is the black wire, connect it to the BIAS pin on the OpenBCI board. The ref electrode (white wire) will go to SRB. Check the OpenBCI documentation for more details and other examples.
Configuration
OpenViBE acquisition server
Once you made sure that the OpenViBE acquisition server is correctly configured to receive data from the python script – default port 12345, Big endian and 32 bits float – you will have to set these locations. Click on Driver Properties and then on Change channel names. Put in the right column the locations previously mentioned.
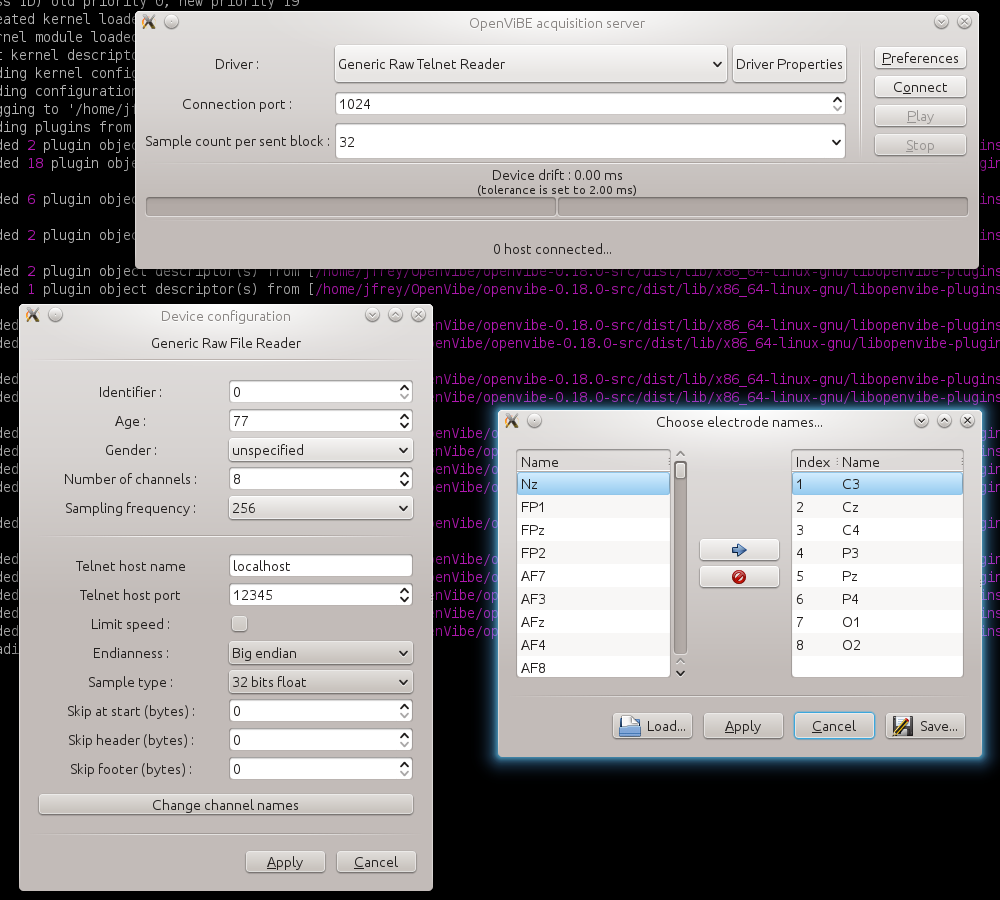
NB: Even if you want to use fewer electrodes, leave the number of channels at “8” because within the python script all signals are sent, no matter how many are truly useful.
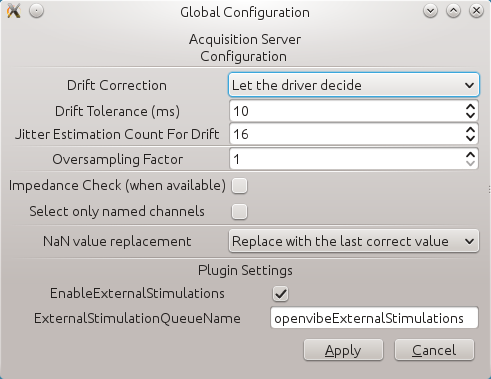
Since you are here, also make sure to enable EnableExternalStimulations in the Preferences of the main dialog and set a 10 ms drift tolerance instead 2 – one or two samples will easily arrive late or early on occasion with the current tools.
P300 CoAdapt scenario
Now we need to mirror the electrodes positions into the P300 CoAdapt configuration file, which is in dist/share/openvibe/applications/CoAdaptP300Stimulator/P300AcquisitionConfig.conf, relative to your OpenViBE installation folder.
Change
CoAdaptP300_Channels=Fz;C3;Cz;C4;P7;P3;Pz;P4;P8;O1;Oz;O2to
CoAdaptP300_Channels=C3;Cz;C4;P3;Pz;P4;O1;O2We may have performances slightly less important than the average with 8 channels. We are venturing into new territories in here!
The reduced number of electrodes has to be reflected in the parameters of the spatial filter box. It’s a bit tricky because of how the scenarios are currently implemented. This time you need to go in dist/share/openvibe/scenarios/bci-examples/p300-coadapt-stimulator/ and edit p300-spatial-filter.cfg.
There are random values for the coefficients by default in the first <SettingValue> tag. Even though they will be overwritten in due time with the right ones, you have to remove a bunch of them to make OpemViBE happy during the first run, from \(3 x 12\) down to \(3 x 8\). The third tag defines how many electrodes are used and the second tag how many “virtual” electrodes will be computed out of them – the dimension of the signal is reduced to make it more discriminant between conditions.
I give you that much details in case you want to try a different number of electrodes, or different parameters, see also the corresponding help page. Or you could just put that in the p300-spatial-filter.cfg:
<OpenViBE-SettingsOverride>
  <SettingValue>1 1 1 1 1 1 1 1 1 1 1 1 1 1 1 1 1 1 1 1 1 1 1 1</SettingValue>
  <SettingValue>3</SettingValue>
  <SettingValue>8</SettingValue>
</OpenViBE-SettingsOverride>
Breath out, it was probably the most complicated part of this tutorial – human beings should not lay eyes on such files and it was a BIG copy-paste. If you managed to do that, the rest will come easy.
Optional: fullscreen mode
By default, the letters grid will appear in windowed mode, to switch to fullscreen edit dist/share/openvibe/applications/externalP300Stimulator/interface-properties.xml, locate the following piece of XML:
<Screen index="${CoAdaptP300_MonitorIndex}" width="${CoAdaptP300_MonitorWidth}" height="${CoAdaptP300_MonitorHeight}">nofull</Screen>…and replace nofull by full. You may be less distracted by adjacent letters when they flash – hence better results – if you maximize the size of the window.
Step-by-step guide
The various scenario files are located in share/openvibe/scenarios/bci-examples/p300-coadapt-stimulator/. Once switched on your OpenBCI board, started the python script and launched the OpenViBE acquisition server + checked that you could feed EEG signal to OpenViBE with the displaySignal.xml, we will get to work. This P300 application consists in 3 steps:
- Calibration. The system has to learn with some machine learning algorithm how your brain reacts to the visual. Not only do we all have different brains – that do not react the same and produce different electrical activities – but the equipment has also a great influence on the recordings. Depending on the amplifier, the type of the electrodes, their exact placement onto the scalp, hair, sweat, weather, how planets are aligned, etc. ; it’s hard to avoid a calibration phase.
- Signal processing. OpenViBE will do some machine learning voodoo in order to learn from the calibration data. Easiest part for end-users, not for the computer (nor for the developers, but those are paid. Usually.)
- Verification. We will visually inspect the signals and have a look at classifier’s performances to assess whether or not the training went well.
- Use-case, that you could summarize as “let’s have some fun”.
Setting letters straight
OK, I lied, I didn’t want to scare you beforehand, there’s a fifth step before the 4 in order to tune further the configuration of the P300 speller. This time it’s not related to electrodes but to how letters flash – and which ones. You may try different parameters. In dist/share/openvibe/applications/CoAdaptP300Stimulator/P300AcquisitionConfig.conf still, edit
CoAdaptP300_NrOfRepetitions=5into
CoAdaptP300_NrOfRepetitions=15The calibration will take longer, but as a first try it’s good not to oversee this step. The accuracy of the whole system is greatly impacted by the calibration. Also change the word that you will carefully focus on, from the short
CoAdaptP300_WordToSpell=TARGETto a classic pangram
CoAdaptP300_WordToSpell=PACK MY BOX WITH FIVE DOZEN LIQUOR JUGSOnce again, the more letters and repetitions are configured and the more reliable the speller will be. One tedious moment. That you will probably need to repeat each time you put the electrodes on, I know, no need to ruin the fun right from the beginning!
Calibration
OK, now we will start to do some P300.
- launch OpenViBE designer, load
p300-coadapt-online-with-monitoring.xmland run the scenario. This version will give you some feedback about what’s going on. - launch
dist/openvibe-coadapt-p300-stimulator.sh. When you are ready to proceed, press theskey on the keyboard. Watch for the letters until the session ends.- Warning: this soft expects a QWERTY – or AZERTY? – keyboard, if you have a “fancy” keyboard layout2 you will have to locate which key “should” be the
s. I have yet to digg into this, but the scripts underneath must use directly scancodes (duh!).
- Warning: this soft expects a QWERTY – or AZERTY? – keyboard, if you have a “fancy” keyboard layout2 you will have to locate which key “should” be the
Once the sentence is complete press ESC to terminate the P300 speller interface. The scenario inside OpenViBE should also have stopped by itself.
We have to close the OpenViBE designer for the changes that we will make in next section to be taken into account – basically each time you modify P300AcquisitionConfig.conf you will have to restart OpenViBE designer.

Signal processing
The data recorded during the calibration have been saved in a .ov files located in a subfolder of the scenario’s folder: dist/share/openvibe/scenarios/bci-examples/p300-coadapt-stimulator/signals. There is a timestamp associated to each run so you do not overwrite data and the name is prefixed with information about the subject; since we don’t have any, we deal with Mr. (or Ms.) “X” here. Spot the last entry – the EEG signals you just recorded – for example x1--_2015.01.29_16.13.52.ov.
Copy this filename to the right place – in P300AcquisitionConfig.conf, you guessed right – along with the folder location, e.g.,
CoAdaptP300_TrainFile=PLEASE_REMEMBER_TO_MODIFY_P300AcquisitionConfig.confCoAdaptP300_TrainFile=${Player_ScenarioDirectory}/signals/x1--_2015.01.29_16.13.52.ovNow we rest and wait for the CPU to heat the room while it tries to discriminate spatially and temporally our EEG signals.
- launch OpenViBE design (again), load and run
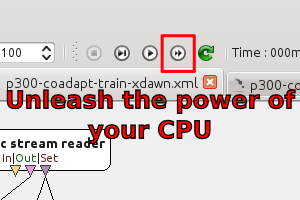
p300-coadapt-train-xdawn.xml. Use the “fast forward” button instead of the regular “play” to speed up the process. Once finished you should see in the output a message sayingxDAWN Spatial filter trained successfully - same goes for
p300-coadapt-train-classifier.xml, with a rough approximation of classifier performance in the output
Verification
You could have a first insight of how the system performed in discriminating your EEG signals (target letter vs non-target letter) by looking at the output of the designer after you ran the classifier, as mentioned above. If you see something alike Training set accuracy is 54.1667% (optimistic), well, it’s not a good start. Chance is 50%, a perfect system would score 100%, I let you do the maths. On the other hand, if the classifier report more than 80% accuracy, there’s some hope. Because the classification results in OpenViBE is kind of broken at the moment – e.g., there’s a bias with the target/non-target ratio – you should really target 90% and higher.
Another and more reliable way to sense if your P300 signal is in “good shape” is to run the p300-coadapt-replay.xml scenario. It’ll plot the averaged ERP (event-related potentials) between target and non-target letters. You should expect a “peak” at about t=300ms (hence the name) in the green curve associated to target letters. It is the main component of the P300; there are others (both negative and positive). The timing and amplitude vary depending on many conditions (alertness, nature of the stimuli, etc.). Don’t worry if the shapes of your signals are different, there’s nothing wrong with your brain, it’s likely that the signal processing “distorted” the plot, or that it just displaying noise.

If you do not obtain a good classification or if you do not see a clear distinction between both curves, check wires, electrodes’ positions, make sure there is not too much noise in EEG signals – you have impedance check into OpenBCI GUI – increase the number of letters and repetitions and re-do the calibration.
You can also try to run the “copy mode” to see how the system behave in a controlled situation, see the complete documentation – do not forget to revert back the changes made to the configuration file if you do so.
Use-case
You’ve patiently followed the instructions, you’ve struggled with the hardware, the software and the textware and finally, this is it, you will use the POWER OF YOUR MIND 3 to spell thought loud letters, words, sentences and, if you have a big fat battery pack attached to your board, novels.
You are three steps away from this ultimate goal. Switch the mode:
CoAdaptP300_AcquisitionMode=CalCoAdaptP300_AcquisitionMode=FrReset the sentence used during calibration
CoAdaptP300_WordToSpell=You can also set CoAdaptP300_EarlyStopping=True to skip some flashes once the system is reasonably sure of your targets. During my attempts, being somewhat tired by that much work, I needed between 5 and 10 flashes to select a letter. If your are focused you should do better.
At last, launch the whole pipeline as during calibration:
- OpenBCI + OpenViBE acquisition server
- OpenViBE designer running
p300-coadapt-online-with-monitoring.xmlscenario - script
openvibe-coadapt-p300-stimulator.shand pressskey to start
This is it, hopefully you are spelling words using your EEG activity!

Beyond
I hope this little piece of information helped you to grasp one of the possible uses of the OpenBCI board. Please refer to the original documentation of the CoAdapt P300 Speller for more advanced features – e.g., word prediction – that could drastically improve your “typing.”
Nothing would be possible without the great work done by the researchers and developers behind OpenViBE and the CoAdapt P300 Speller – not only code, but also documentation. While I mingle from time to time with some of these people, I’m not one of them, not even a P300 expert (far from it!), just a regular user of OpenViBE, hacking for my own agenda. The same goes with OpenBCI, a shout-out for the team that made accessible a cheap, versatile and reliable EEG device4. It won’t replace medical grade devices, but it’s a good start for hackers out there.
There’s many more applications waiting to rocket your EEG within OpenViBE, and many many more if you learn how to create new scenarios – it’s a graphical language, it’s messy easy to get your teeth into neurofeedback.
Please contribute to those different projects, and to this very tutorial if you see any mistake5 or if I’m not clear in my explanations.
