
Last time we saw how to use OpenBCI to spell clever words, today we will learn the principle behind another well documented application of BCI: motor imagery.
The goal is to trigger events, usually to move “things”, by using the brain activity that relates to hands and feet. “Hold on!”, you may say, “I’ve already seen cool stuff moving thanks to OpenBCI in other places of the web, there’s nothing new in here.” Well, in this case, it is another type of brain activity that is used, dubbed as SSVEP, for steady state visually evoked potential. Basically you focus on a flashing light, the frequency is reflected within some part of your brain, and an EEG analysis could detect that. (With sounds it would be steady-state auditory evoked potentials; with touch, tactile evoked potentials, you got the idea.) SSVEP is reliable and works for almost everybody with no prior training. SSVEP is great – and there are several scenarios using them in OpenViBE examples – but it is more of a reflex toward external stimuli – blinking lights – than a voluntary control of your brain activity. It is not exactly what comes up when one think about “mind control”; the key difference between a reactive BCI and an active BCI. It is like the difference between your leg moving because a tendon around your knee has been smashed with a reflex hammer and your leg moving because you want it to.
So, now that your are convinced, back to motor imagery. Why hands and feet specifically? Because large areas of the cortex – the outer layer of the brain – are linked to those body parts, size relating to accuracy and sensitivity. Look for “penfield’s homunculus” on your favorite search engine to get a clearer picture. The good thing with motor imagery is that the brain activity is similar whenever you actually do the movements or when you simply imagine them – even though it takes some practice to produce the “right” mental activity. EEG spatial resolution being not so great, it would be next to impossible to differentiate between different finger movements. To do so you would need other brain imagery techniques, and you don’t want to have electrodes implanted in your brain. Not yet.
The great battle between left and right
Let start with the hands for a two-class BCI. For the software, once again, we will use OpenViBE. You will need the OpenBCI python scripts to stream data to the current version, or grab the development version for an early OpenBCI driver.
Regarding hardware, it’ll be better to use the daisy module as more electrodes means more accuracy. The motor cortex is situated along the “center” of your brain, a thin band that spans approximately from one ear to the other, so the electrodes will be positioned accordingly. In the 10-20 system, the left hand activity takes place around C4 and the right hand around C3 (hemispheres’ connectivity is “inverted”). As our brains are not alike and EEG headsets are never positioned perfectly, we will put some more electrodes around these locations.
Because I am lazy, I took the same layout as the one I used with the P300 speller and just added new electrodes onto my EEG headset. Even though on the schematic I replaced P3 and P4 by FCz and CPz, in fact I used the leftover blank and white cables of the daisy module so as not to remove one of my 3D printed holders – we need only one ground and one reference. You may try other positions, especially because a filter will “learn” to discriminate both hands activities later on, but you should try at least to have two “crosses” around C3 and C4, with respectively C5, FC3, CP3, C1 and C2, FC4, CP4, C6.
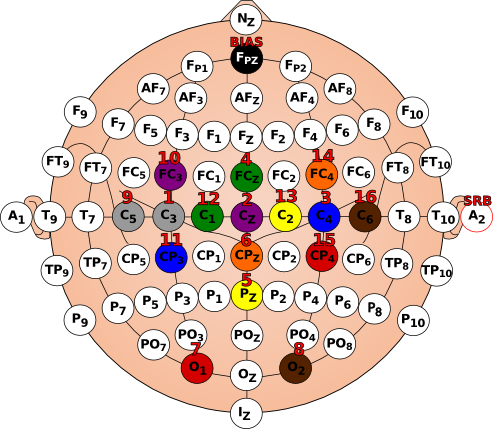
To prepare for the installation of the EEG headset, I usually print a map of the electrodes localization. There are some images of the 10-20 system that exist around the web, but it’s easier to color a proper SVG file, so I take the opportunity of this post to advertise an easy-to-customize image. Feel free to use it.
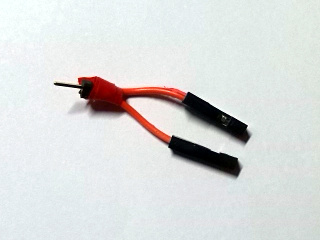
A note about the daisy module: in order to share the reference electrode between the main board and the module, you will have to craft a “Y cable” – one male connector at one end, two female at the other. Maybe there is something alike available in store, I soldered mine with spare cables. Thanks to this cable the earlobe reference is attached to both SRB2 pins.
To be more precise about the type of brain activity we are dealing with, we will be looking for the “beta rebound”, an increase within the beta frequency band (roughly around 16 and 24Hz) that occurs after the movement – real or imagined – ends. Be warned, this beta rebound is not observable with EEG with everyone, so do not creep out because you see flat lines all along.
We’re all set with the theory, you have your EEG headset on – possibly with lot’s of gel in the hair – it’s time to start the OpenViBE acquisition server and set the channel names. It’ll be, in this order if you choose the same locations as me: C3;Cz;C4;FCz;Pz;CPz;O1;O2;C5;FC3;CP3;C1;C2;FC4;CP4;C6. Start data acquisition, launch the designer and load the scenarios related to hands imagery. They are inside the folder dist/share/openvibe/scenarios/bci-examples/motor-imagery-CSP/ of your OpenViBE installation.
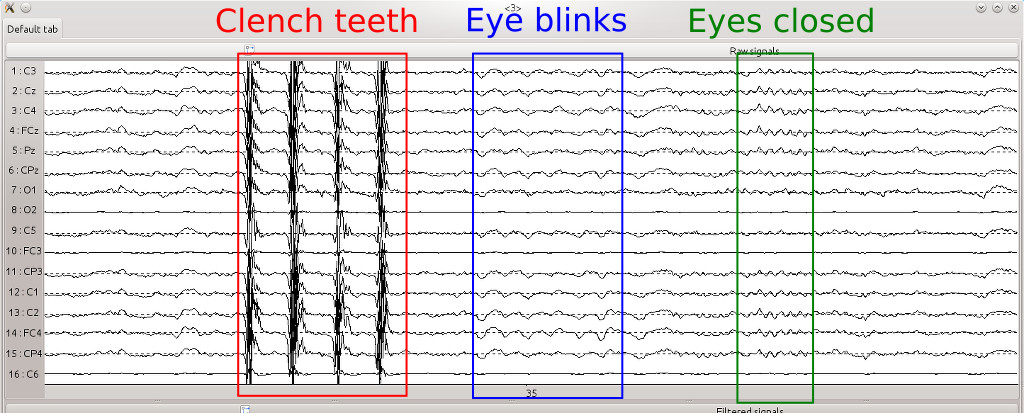
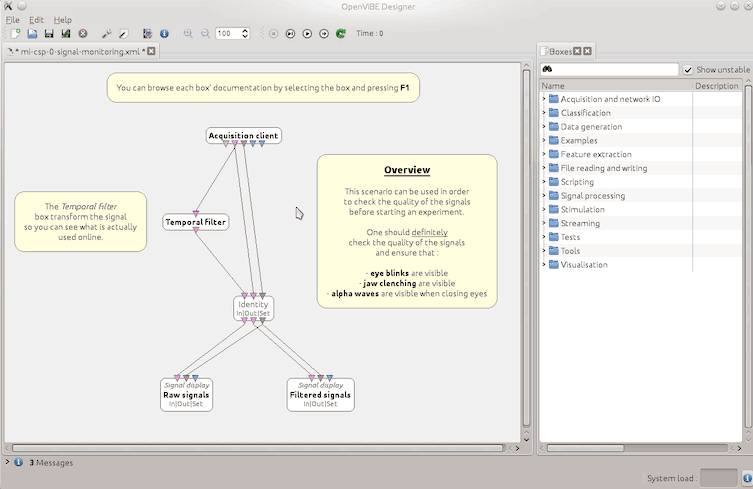
mi-csp-0-signal-monitoring.xml is just here to display signal and control for the quality of EEG recordings. As mentioned by the scenario, clenching your teeth and eyes blinks should produce artifacts. By closing your eyes you will see – afterwards – “real” EEG activity with an increase within the alpha frequency band (~ 8-12Hz) visible in the raw signals.
If you use the integrated OpenBCI driver, you will have to discard the data related to the accelerometers. They appear in the last 3 channels and not only are they irrelevant to motor imagery, but they will likely prevent the system to learn from actual EEG signals. The monitoring scenario is the perfect opportunity to customize for the first time a scenario by inserting a new box in the beginning of the pipeline. It’s node programming, nothing to fear. Drag and drop a Channel selector box from the Signal processing -> Basic menu of the right pane to main window, double click on it (or right click -> configure box…) and enter 1:16 in the “Channel list” field, confirm by clicking on “Apply”. Then create a new link, from the “signal” output pin of the Acquisition client box to the corresponding input pin of the Channel selector box (both pins are pink). Finally, attach the selected channels to the rest by linking the output of said box to Temporal filter and Identity inputs. To understand the signal processing workflow, follow the lines! If some of your electrodes are too noisy, it may be a good idea to be even more selective and remove the faulty channels at the same time you get rid of the accelerometers.
You’ll have to do the same for the next scenario, mi-csp-1-acquisition.xml. With this one, the real work begins, as it will record a baseline to calibrate the system. Run the scenario; after about 30s – the time for you to settle down – a green cross appears and a sequence of random arrows starts. When a left arrow shows up, try to imagine a left hand movement – or maybe, for your first attempts with motor imagery, do real movements instead. Keep imagining / doing this movement until the green cross disappears. Shortly after a new trial will start (new cross, new arrow). Of course it’ll be the opposite hand in charge when a right arrow is involved. There’s 40 trials, 20 for each direction. It lasts for a little more than 7 minutes and… it’s tedious. You have to earn your BCI! During the calibration – as soon as you use EEG in fact – you will have to remain relaxed. Try not to move during the trials; not at all if you imagine hands movements and nothing but the hands if you do real movements. Avoid eye blinks or to swallow when a cross or an arrow is displayed – you’ve seen what kind of artifacts are caused by such muscular activity!
A file with the .ov extension will be created in the signals folder next to the scenarios files. A timestamp in the filename helps you to locate the last recordings. The next scenario, mi-csp-2-train-CSP.xml will use this file to calibrate the spatial filters – that is to say which combination of electrodes yields the best discrimination between left hand and right hand EEG activity. Edit the Generic stream reader box to point to the file which has just been recorded, for example motor-imagery-csp-1-acquisition-[2015.03.02-16.51.43].ov. You won’t need to select channels because if you did the job right with the previous scenario, only the wanted channels have been recorded. You can fast-forward this scenario, no need for real time here. It’ll be the same with the next in the list, mi-csp-3-classifier-trainer.xml. Once again point to the right file and fast-forward. When it’s finished the classifier is trained, meaning that the machine should have learned the brain patterns associated to each hand. In the console output you will see a classification score. Don’t expect good performance below 75%. Some people, such as myself, have troubles with motor imagery. Whatever the EEG material, my scores are not very high. It could take several sessions of several hours to achieve good results… I have not the patience. For the anecdote, one of the best scorer I’ve ever seen was doing meditation and yoga. For sure it helps to focus and quite the mind.
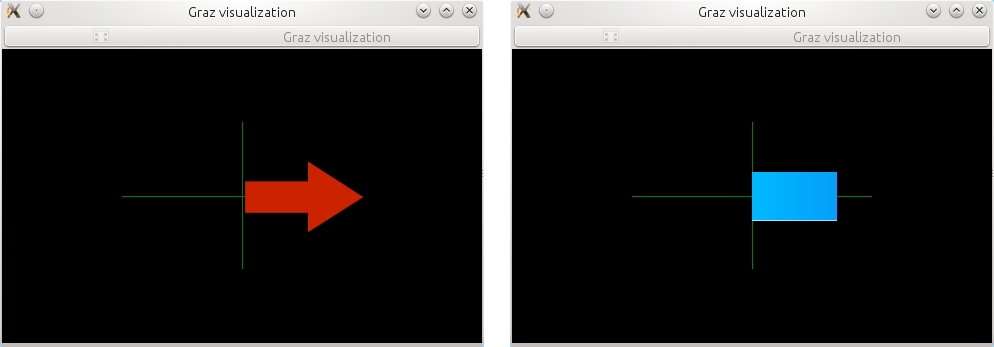
When the computer is trained you can launch the very last scenario, mi-csp-4-online.xml – do not forget to select EEG channels if you need to, it’s possible to copy and paste boxes between scenarios to save time. In this run a red arrow will indicate which movement you should imagine. A blue bar will give you a real-time feedback of what the machine understands. Disclaimer: it’s difficult enough for the system to read your EEG, be consistent with what you’ve imagined / done earlier during the calibration phase. Ideally the blue bar should appear at the same place as the arrow. If it doesn’t work, like, at all, do not give up right away1. Active BCIs need practice and patience to be mastered. Check electrodes signals, the positions, calm yourself, redo the calibration.
One difficulty with current BCIs is… that it’s boring. Let’s face it, moving blue bars is hardly engaging; that does not facilitate the training. There is currently a whole research area which tries to enhance BCI training – and if you want to be part of the effort it is not that hard; you may have seen that it is possible to create “Lua” and “Python” scripted boxes right within OpenViBE. Anybody want to try kivy for nice feedback? It is also possible to export the output of the classifier – the signal representing what the machine “understand” of your brain patterns – from OpenViBE to external programs by using protocols such as VRPN, OSC or LSL. As a matter of fact, the VRPN protocol is used to modify a 3D scene in a companion program that comes with OpenViBE. But instead of going handball – pushing a ball between left and right goals is what this “openvibe-vr-demo-handball” is about – let’s use a different and simpler motor imagery, and a much cooler feedback.
Let’s go bigger
This time we will focus on the feet, with a much simpler calibration, as there will be only one class – a beta rebound associated to feet or not. Besides, no daisy module is required, 5 electrodes will suffice, C1;FCz;Cz;CPz;C2. Instead of a machine learning algorithm (the “CSP” filter above) it is a laplacian filter that will be applied in order to retain only brain signals related to the feet – i.e., “take four times Cz and subtract the activity of the 4 electrodes nearby”. On the OpenBCI side, remember to deactivate the unused channels so they won’t interfere with the common mode noise rejection. If you keep the same montage as for hands motor imagery, enter the sequence 13578qweyui in the python console or in the properties of the OperBCI driver, depending on your acquisition method (see OpenBCI docs for the exact meaning of this obscure code).

You will have to grab a scenario that was used in a previous OpenViBE workshop. You’re looking for OpenViBE-workshop_tie-fighter-demo.zip. Download, unzip and open the different scenarios in OpenViBE. This demo was made for the 0.18 version and it contains one slight little bug. The bug comes from a faulty link, the “Lua stimulator” box named Self-paced session in Use-the-force-online_5chanLaplacianCz_self-paced-session.xml should be linked to the Identity box instead of Acquisition client. I’m not worried, you now know how to fix that. But if you’re using the 1.0 release then you’ll see various boxes that are grayed out, meaning that the corresponding OpenViBE code has been changed in the meantime. Updating those boxes takes a little more effort; fortunately for you I’ve already done the job and you can replace the scenarios with the .xml files that are available in this gist.
As opposed to the previous section, the calibration will not consist in training machine learning algorithms, but in measuring a baseline of your beta band activity. Run the scenario threshold_movement_calibration.xml. After a 30s period where you should do nothing but chill out, some numbers will come up. Write down the one appearing in the window “Mean + 3 * sqrt(Variance)”.
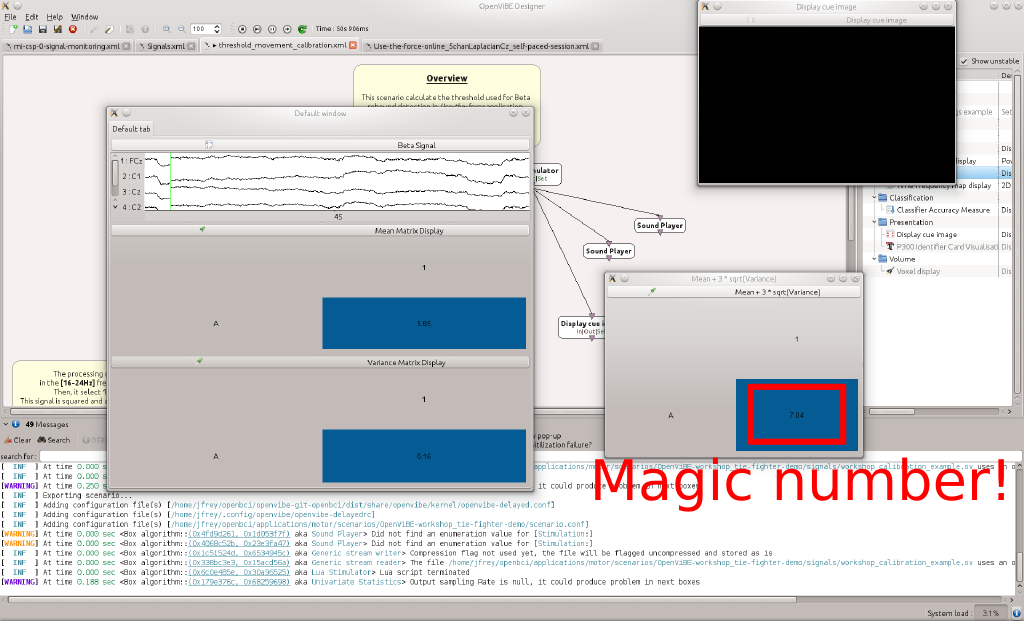
You will have to copy this number in two locations in the next (and last) scenario, Use-the-force-online_5chanLaplacianCz_self-paced-session.xml. First location: the Crop box, in the Min crop value field. Second location: Shift values box, replace the existing value in the Equation field, e.g. x-13.37. Thanks to these two boxes, only the beta activity related to motor imagery will produce values above 0. Hopefully. When you run the scenario and move your feet – or imagine feet movement – then you should see the beta rebound in the plot. You will also see how easy it is to produce artifacts. Clench your teeth and your beta rebound will go off chart. No EEG involved in here, only direct muscle activity.
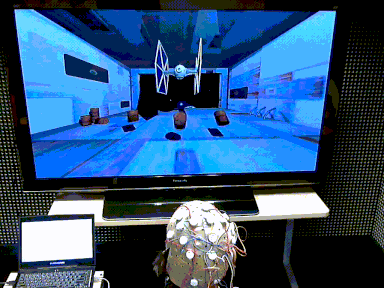
I’ve talked about VRPN earlier, and indeed, there is an Analog VRPN server box in this scenario. If you launch the program dist/openvibe-vr-demo-spaceship, a (slightly outdated) 3D scene will appear with a… spaceship in the middle. If you run the OpenViBE scenario at the same time, you should see, baffled, that the spaceship lifts off as soon a beta rebound is detected, and the stronger the rebound, the higher the spaceship – sorry, you will have to wait before an actual vessel is shipped with OpenViBE. In the OpenViBE versions prior to 1.0 the program is called openvibe-vr-demo-tie-fighter. You may easily infer what is the difference, and why I chose an older version to illustrate this section2.
I said BIGGER
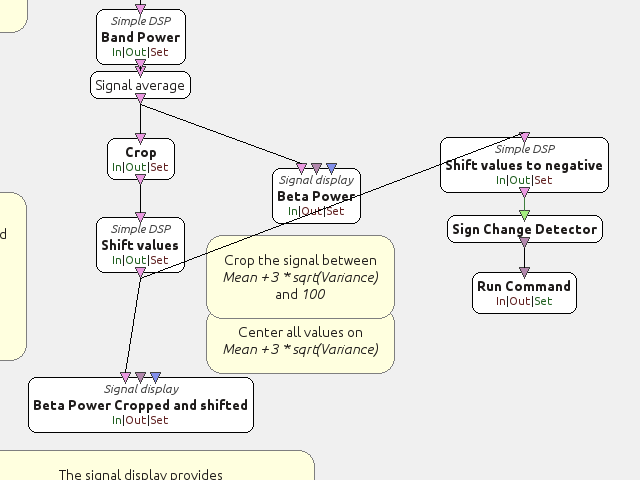
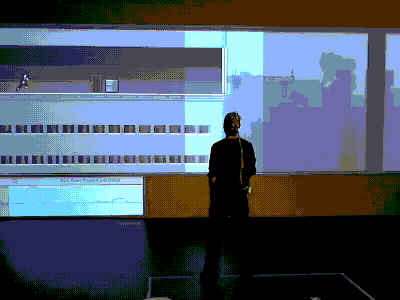
So we’ve got VRPN to communicate our processed EEG signals to the exterior world. What, you want an even simpler method to output such data? You’re asking a lot! Let me search… OpenViBE boxes… hmm… a Run Command seems promising… could be triggered by a Sign Change Detector… that could be linked itself to a Simple DSP to shift the baseline of the beta band slightly below 0. The stack seems all right, let’s look for a simple command to send keyboard events now… ah-ah! I’m lucky to run Linux, there’s a neat xdotool available. I just have to write xdotool key space inside the Run Command box and with OpenViBE running in the background all apps will receive said key sequence along each beta rebound. Then I could launch my browser3 and go for, let’s say, http://www.adamatomic.com/canabalt/. How neat is that?
Adjust the height of the jumps with xdotool keydown --delay 200 space keyup space to make the game somewhat more playable
– I’m sure it’d not be hard to modulate this delay according to the amount of beta.
Under Windows there is (at least) one alternative to xdotool, it’s AutoIt. The portable version will suffice. Create a script called press_space.au3 with the following content:
Send("{SPACE down}")
Sleep(200)
Send("{SPACE up}")
The Run Command parameter will be: C:/path/to/autoit-v3/install/AutoIt3_x64.exe C:/path/to/press_space.au3 (slashes instead of backslashes on purpose, the kind of oddities that happen when Unix and Windows worlds collide).
Congrats, you’ve achieved you initiation to motor imagery with OpenBCI and OpenViBE. If you want more than one trigger, you can duplicate the pipeline to detect right hand / left hand movement – laplacian filters around C3 and C4 respectively – or go back to the first section and adapt the “motor-imagery-CSP” example. Now it’s your turn to play – literally or not – with your EEG ;)
Warning: it’s very easy to record muscle artifacts instead of EEG signals and actual motor imagery. This page describes my first attempt at using OpenBCI in such settings. I won’t hide the fact that I struggled to get real “beta rebounds”. The purpose of this article is to document how OpenBCI and OpenViBE can work together seamlessly. You will have to investigate and to train – and possibly to adapt electrodes locations or the temporal filters settings – in order to accommodate signal processing with your brain. I am by no means claiming that OpenBCI is suitable for accurate motor imagery. Answering this question will need a dedicated scientific investigation – and I’m looking forward to it.